In this exercise, you will write an on demand
Script Include to validate email address syntax. The Script Include can
be used by any scoped application and not just the NeedIt application.
Preparation
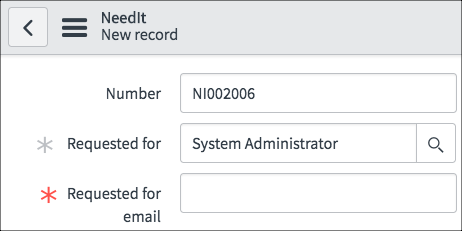
Add a string field to the NeedIt table to store an email address.
-
In Studio, use the Application Explorer to open Forms & UI > Forms > NeedIt [Default view].
-
In the Field Navigator, switch to the Field Types tab.
- Locate the String
data type in the Fields Types tab. Click, hold, and drag the String
data type to the NeedIt form. Drop the String data type beneath the
Requested for field.

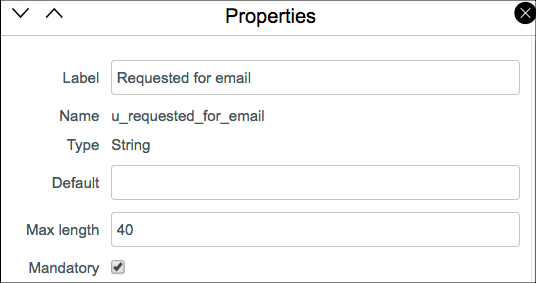
- Hover over the new field and click the Edit Properties button (
 ) to configure the new field.
- Configure the field:

- Close the Properties dialog by clicking the Close button (
 ).
).
- Click the Save button in the Form Design header to add the field to the NeedIt table in the database.
Write the On Demand Script Include
-
Create a Script Include.
- In Studio, click the Create Application File button.
- In the Filter… field enter the text Script OR select Server Development from the categories in the left hand pane.
- Select Script Include in the middle pane as the file type then click the Create button.
-
Configure the Script Include:
Name: validateEmailAddress
API Name: (this field value is automatically populated)
Application: (this field value is automatically populated)
Accessible from: All application scopes
Active: Selected (checked)
Description: On demand Script Include to validate email address syntax using regular expressions.
-
Delete the template from the Script field. Copy this script and paste it into the Script field.
function validateEmailAddress(emailStr){
emailStr = emailStr + '';
if(emailStr.match(/^(([^<>()\[\]\\.,;:\s@"]+(\.[^<>()\[\]\\.,;:\s@"]+)*)|(".+"))@((\[[0-9]{1,3}\.[0-9]{1,3}\.[0-9]{1,3}\.[0-9]{1,3}])|(([a-zA-Z\-0-9]+\.)+[a-zA-Z]{2,}))$/)){
return true;
}
else {
return false;
}
}
-
Click the Submit button.
Use the Script Include in a Business Rule
- Create a Business Rule.
- In Studio, click the Create Application File button.
- In the Filter… field enter the text Business OR select Server Development from the categories in the left hand pane.
- Select Business Rule in the middle pane as the file type then click the Create button.
- Configure the Business Rule:
Name: Email Address Syntax Validate
Table: NeedIt [x_<your_company_code>_needit_needit]
Active: Selected (checked)
Advanced: Selected (checked)
-
Switch to the When to run section and continue configuring the Business Rule:
When: Before
Insert: Selected (checked)
Update: Selected (checked)
-
Click the Submit button.
-
Switch to the Advanced section.
-
Copy this script and paste it into the
executeRule function in the Script field. Do not overwrite the template;
paste the script after the Add your code here comment.
var isEmail = validateEmailAddress(current.u_requested_for_email);
if(isEmail == false){
gs.addErrorMessage(current.u_requested_for_email + " is not a valid email address. You must provide a valid email address.");
current.setAbortAction(true);
}
-
Click the Update button.
QUESTION: You could write the
validation logic in the Business Rule instead of using a Script Include.
Given that, why use a Script Include? If you aren’t sure, scroll to the
Answers section at the bottom of this page.
Test the Business Rule and Script Include
-
Switch to the main ServiceNow browser window and use the browser’s refresh button to reload ServiceNow.
QUESTION: Why do you have to reload ServiceNow? If you aren’t sure, scroll to the Answers section at the bottom of this page.
-
Create a new NeedIt record or open an existing NeedIt record for editing.
- Enter an invalid email address, such as hello, in the Requested for email field.
- Click the Additional actions menu (
 ) and select the Save menu item. Do not click the Submit or Update buttons because that will take you away from the form.
- Examine the error message.
- Enter a different invalid email address, such as an address with no .com at the end, in the Requested for email field.
- Click the Additional actions menu (
 ) and select the Save menu item.
- Enter an email address with valid syntax in the Requested for email field.
- Click the Additional actions menu (
 ) and select the Save menu item. There should be no error message.
Answers
Question: Why not write the email syntax validation in the Business Rule and not in the Script Include?
Answer:
Many applications or even tables within the same application will have
email fields. Instead of writing the same logic for each application or
table, create a Script Include that is accessible by all application
scopes. This allows you to write the validation script logic only once.
Question: Why do you have to reload the main ServiceNow browser window?
Answer: You added a field to the NeedIt Default view. ServiceNow had to be reloaded to display the new field on the NeedIt form.

 ) to configure the new field.
 ).
). ) and select the Save menu item. Do not click the Submit or Update buttons because that will take you away from the form.