Data Import Process - ServiceNow

Data Import Process

Data is not imported directly from a Data Source into the target table. The steps are:
  1. Load Data into a staging table
  2. Create Transform Map
  3. Run Transform to move data from the staging table to the target table
  4. Check data integrity The Data Import Process
Use Studio to create Data Sources. All other data import operations are done in the main ServiceNow browser window and are not captured as part of a scoped application.

Securing Application Access Summary

Securing Applications Against Unauthorized Applications Module Recap

Core concepts:
  • Runtime Access Tracking manages script access to resources from other applications
    • Table
    • Script Include
    • Scriptable
  • Runtime Access settings are:
    • None
    • Tracking
    • Enforcing
  • Application Access controls which scope(s) can perform database operations against application tables:
    • This application scope only
    • All application scopes
  • Application Access restricts database operations:
    • Can read
    • Can write
    • Can update
    • Can delete
  • Can disable table access by web services
  • Restrict whether out-of-scope applications can create application files:
    • Business Rules
    • New fields
    • Client Scripts
    • UI Actions

Securing Applications in ServiceNow

Securing Applications against Unauthorized Users Module Recap

Core concepts:
  • Scoped applications can be secured at the application, application menu, and module levels
  • Groups are a set of users with a common purpose
  • Assign roles and users to groups
  • Groups and user records are not part of an application
  • Access Controls grant access to records and record fields
    • Create
    • Read
    • Update
    • Delete
  • Debug Access Controls with the Debug Security Rules module
  • Impersonate users to test security
  • Access Control roles are evaluated first, then conditions, then scripts
  • Roles, conditions, and scripts must all return true for an Access Control to grant access
  • Do not attempt to protect sensitive data with client-side scripted security

Scripting Security - Usefull APIs related to check the users roles and security

Scripting Security

Both the client-side and server-side APIs have methods for scripting security.
The client-side GlideUser (g_user) API has these methods:
  • hasRole()
  • hasRoleExactly()
  • hasRoleFromList()
  • hasRoles()
The client-side API methods can be used in any client-side script such as Client Scripts and UI Policy scripts. Client-side security is the easiest security to break. Do not depend on client-side scripts to secure sensitive data.
The server-side GlideSystem (gs) API has these methods:
  • getUser()
  • getUserID()
  • getUserName()
  • hasRole()
  • isLoggedIn()
  • isInteractive()
  • getSession()
The server-side GlideElement API has methods to check whether a user’s role allows them to access the associated GlideRecord(s):
  • canCreate()
  • canRead()
  • canWrite()
The server-side methods can be used in any server-side script such as Business Rules or Script Includes. Server-side scripted security is more secure than client-side scripted security. Any user with access to scripting fields can see the scripts and see what the security checks are.
Neither client-side nor server-side scripts are part of the Debug Security Rules module. When security is scripted outside of Access Controls, it must be debugged independently of the Access Controls.
For the highest level of security, use Access Controls to protect sensitive data.

Debugging Access Controls servicenow

Debugging Access Controls

To enable Access Control debugging, use the Application Navigator in the main ServiceNow browser window (not Studio) to open System Security > Debugging > Debug Security Rules. The Debug Security Rules module runs a script that enables writing all Access Control debugging information to the bottom of each page in the content frame.
Only admin users have access to the Debug Security Rules module. In most cases, Access Controls need to be debugged for users other than the admin user. After enabling Debug Security Rules as an admin user, impersonate a user to test their access.
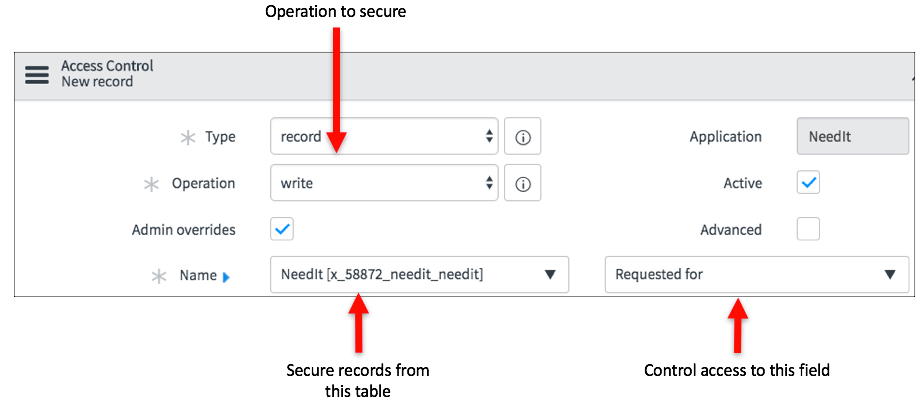
In this example, Beth Anglin is denied access to Field 3 on Table in the Generic application:
Beth is denied access to Field 3
The first row states the overall evaluation of the Access Control: Grant or Deny. The Access Control is a read Access Control for Field 3.
The second row shows the evaluation of the table-level Access Control followed by the field-level Access Control. In this case both the table-level and field-level Access Controls are shown to make it clear which Access Control denied access.
The debugging information is shown in order of evaluation:
Order of evaluation
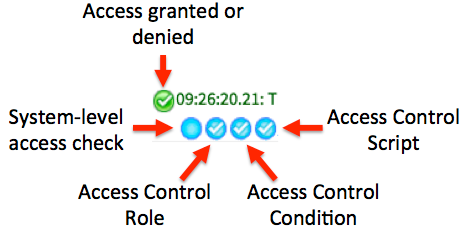
It is important to examine both the color code and the symbols.
  • Green: Access granted
  • Red: Access denied
  • Blue: The rule did not have to be re-evaluated because the result is already in the cache
  • Gray: Not evaluated, typically because part of the rule has already denied access
  • Check mark: Passed
  • X: Failed
The system-level access check is not part of an Access Control. It runs before Access Controls are evaluated and looks for system/runtime reasons why a user should or should not be granted access. For example, Delegated Development grants developers permission to create only certain types of application files. Fred might be able to create Business Rules but Beth cannot. Permission to create application files in a Delegated Development environment is not controlled by Access Controls and is determined at runtime by a system-level access check.
Look again at the Field 3 Access Control for Beth. Her access to Field 3 was denied by the role on the field-level Access Control even though the table-level Access Control granted access. The condition and script on the field-level Access Control were not evaluated because the role denied access.
Beth is denied access to Field 3
To disable Access Control debugging use the Application Navigator in the main ServiceNow browser window to open System Security > Debugging > Stop Debugging. If you have impersonated a user, impersonate the System Administrator to disable Access Controls.
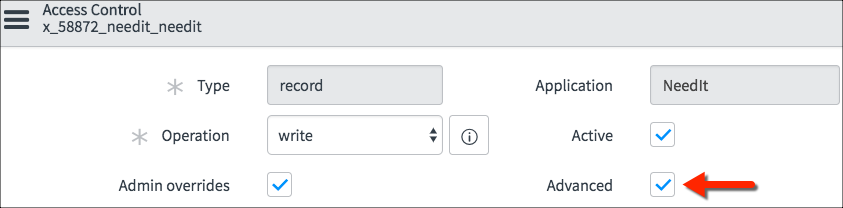
DEVELOPER TIP: The Admin overrides option in Access Control configuration grants access to the admin user even if the admin user doesn’t meet the requirements of the Access Control. Use caution when testing Access Controls as the admin user as it may not be indicative of the Access Control’s behavior.

Debug a Single Field’s Access Controls

To debug the Access Controls for a single field rather than the entire content frame, with Debug Security Rules enabled, open the table’s form.
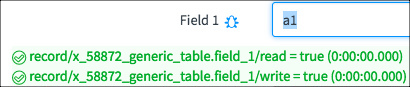
A Debug icon (Debug icon) appears next to each field. Hover over the Debug icon to see how many Access Control messages there are for the field. Click the Debug icon to see the Access Controls for that field. This strategy, obviously, cannot be used to debug fields that are hidden by Access Controls.
Single field Access Controls

Creating and Editing the Access Controls in Servicenow

Creating and Editing Access Controls

Users with the admin role can view Access Control records but cannot create, delete, or update Access Controls. All Access control operations except read require elevated security privileges. Elevated security privileges are also known as the security_admin role.
Elevate security privileges in the main ServiceNow browser window (not Studio). Open the User menu in the banner and select Elevate Roles.
Elevating privileges
In the Elevate Roles dialog, select security_admin then click the OK button.
Elevate Roles dialog
The security_admin role times out. Depending on how long you are working on Access Controls, you might have to elevate privileges several times.
Access Controls can be created for:
  • Records
  • Client callable Script Includes
  • Processors
  • REST Endpoints
  • UI Pages
This module discusses Access Controls for records.
There are four sections in Access Controls:
  • Table/field
  • Requires Role
  • Condition
  • Script
In order for permission to be granted to access a table/field, the Requires Role, Condition, and Script sections must all return true. If there is no value, the section returns true.

Table/Field

Use the Name field in the Access Control configuration to specify which records and which field are secured. In the example, the Access Control grants write access to the NeedIt table’s Requested for field.
Requested for Access Control
The example rule is a write rule:
Write: [NeedIt] [Requested for]

Requires Role

Use the Requires role list to specify the role(s) required to access records. Click the Insert a new row… line to add a role to the list. If there are multiple rows in the list, the user must have only one of the roles for Requires Role to return true.
The NeedIt User role is required
To remove a role from the list, click the red X in the role’s row. Clicking the X removes the role from the Access Control but does not delete the role from the database.

Condition

Use the Condition field to create the condition(s) required to grant access. In this example, the Requested for value must be the currently logged in user.
Requested for must be the currently logged in user
The condition is tested dynamically and the number of matching records in the database is reported. Click the link to open a list of matching records in a new tab. Click the double arrow icon to refresh the count.
Matching records

Script

Select the Advanced option to see the Script field.
Advanced Option
Access Control scripts execute server-side. For best performance, avoid Access Control scripts that use GlideRecord queries as they can adversely impact performance.
Restrict the script logic only to security-related logic. If other logic is included, such as managing date formats or validating record data, it can be difficult to debug problems in the future as you might not think to look in Access Control scripts for those actions.
Some useful methods for Access Control scripts include:
  • GlideSystem: getUser(), getUserID(), getUserName(), hasRole(), isLoggedIn(), isInteractive(), getSession()
  • GlideRecord: isNewRecord()
Access Control scripts must set the answer variable to true or false.
if (!gs.hasRole("admin") && !gs.hasRole("user_admin") && gs.getSession().isInteractive()) {
 answer = true;
}
else{
 answer = false;
}

Securing Servicenow application using access control at the table level

Securing Table Records

Tables

When creating tables in scoped applications, you must assign a role to the table. Specify the User role in the Controls section of the table form. You can dynamically create a new role or assign an existing role.
For all scoped application tables, the Create access controls option is selected and is read-only. The combination of Access Controls plus roles provide the minimum amount of security to protect a table’s records against unauthorized access. In the default case, only users with the table’s role can create, read, update, and delete table records.
Assigning a User role to a table

Access Controls

Access Controls restrict access to data by requiring users to pass a set of requirements. Access Controls define:
  • What is being secured
  • The operation being secured
  • The permissions required to access the object
Access Controls are automatically created when tables are added to scoped applications. The four default Access Controls grant access to the table’s records. Permission is granted for these operations:
  • Create
  • Read
  • Write
  • Delete
To be granted access by the default Access Controls, a user must have the User role specified for the table.
The four default Access Controls for the NeedIt table
The default Access Controls grant permissions for entire table records; there are no default restrictions for record fields.
ServiceNow is default deny unless configured otherwise. Permission must be explicitly granted by Access Controls for a user to have access to records and record fields.

Server Side Scripts Summary - ServiceNow

Core Concepts:
  • Server-side scripts execute on the ServiceNow server and have access to the database
  • Business Rules are triggered by database operations: query, update, insert, and delete
  • Business Rule script logic is executed relative to when the database operation occurs
    • before
    • after
    • async
    • display
  • Debug Business Rules using:
    • JavaScript Debugger - debug script logic
    • Debug Business Rule (Details) - debug condition script
    • Application log - view log messages
  • Use the JavaScript Debugger to debug synchronous server-side scripts
    • See variable values
    • Set breakpoints
    • View call stack
    • See transaction information
  • Script Includes are reusable server-side logic
  • On demand/classless Script Includes
    • Cannot be called from the client-side
    • Contain a single function
  • Script Includes which extend a class
    • Inherit properties of extended class
    • Do not override inherited properties
    • Most commonly extended class is GlideAjax
  • Script Includes can create a new class (does not extend an existing class)
    • Many applications have a Utils Script Include
    • Initialize function automatically invoked
    • Developer must write all properties

Different Types of Server Side Scripts and how they are triggered - ServiceNow

Other Server-side Script Types

In this module you have learned to write, test, and debug Business Rules and Script Includes. There are many other types of server-side scripts. The primary difference between the script types is what triggers the script logic execution.
The table shows some commonly used server-side script types.
Script Type Executes on Description Often used to
Business Rule Database access Execute logic when records are queried, updated, inserted, or deleted. Validate data or set fields on other records in response to fields on the current record.
Script Include Must be explicitly called A library of reusable functions. Validate format, retrieve shared records, and work with application properties.
Script Action Events Respond to an event. Send email notifications or write logging information.
Scheduled Script Execution (also known as a Scheduled Job) Time Script logic executed on a time-based schedule. Create reports: send daily, weekly, monthly, quarterly, and annual information. Execute script logic only on weekdays or weekends. Can also be run on demand so sometimes used for testing.
UI Actions Users Add buttons, links, and context menu items to forms and list to allow users to perform application-specific operations. Enable users to perform actions such as navigating to another page, modifying records, or allowing operations such as saving.
Scripts - Background admin users only (some instances require the security_admin role) Execute server-side code on demand from a selectable scope. Scripts - Background should be used with caution because badly written scripts can damage the database. Test scripts.
Fix Scripts Application installation or upgrade Make changes that are necessary for the data integrity or product stability. Create or modify groups or user authorizations.
Notification Email Script Notification Execute when emails are generated to add content to the email content or configuration. Add a CC or BCC email address, or query the database and write information to the message body.
Scripted REST APIs Request sent or received through web services Defines a web service endpoint Return value(s) or a JSON object based on a calculation or database lookup(s)
UI Page Processing Script Users Executes when a UI Page is submitted. Validating data, setting values etc.
Transform Map Script Data import Modifies or copies data or data format when records are imported. Standardize date formats, fill in missing data, standardize values, map incoming values to database values for choice lists, set default values.
You can practice using additional server-side script types in other courses and modules on the ServiceNow developer site.

Calling Service Side Script function from another Service Side Script

Create a script include something like this:
name of the script include is : NeedItUtils
isDatePast: function(strDate){
  // Create GlideDateTime objects for the current date and the passed in date
  var rightnow = new GlideDateTime();
  var testdate = new GlideDateTime(strDate);

  // If the testdate is before rightnow, return true, else return false
  if (testdate.before(rightnow)) {
   return true;
  }
  else {
   return false;
  }
 },
 
 
Calling this from another business rules something like this below:
 
// Instantiate the NeedItUtils class.  Call the isDatePast method and pass 
 // the u_when_needed value.
 var niutils = new NeedItUtils();
 var isPast = niutils.isDatePast(current.u_when_needed);

 // If the isDatePast method returns true, the date is in the past.
 if(isPast == true){
  gs.addErrorMessage("When needed date cannot be in the past.  Your request has not been saved to the database.");
  current.setAbortAction(true);
 } 

GlideAjax example servicenow

Server Side Script Include:

var GetEmailAddress = Class.create();
// Extend the global.AbstractAjaxProcessor class
GetEmailAddress.prototype = Object.extendsObject(global.AbstractAjaxProcessor,{
 // Define the getEmail function.  
 // Create a GlideRecord for the User table.
 // Use the sysparm_userID passed from the client side to retrieve a record from the User table.
 // Return the email address for the requested record
 getEmail: function() {
  var userRecord = new GlideRecord("sys_user");
  userRecord.get(this.getParameter('sysparm_userID'));
  return userRecord.email + '';
 },
 type: 'GetEmailAddress'
});


client script to call the GlideAjax:

function onChange(control, oldValue, newValue, isLoading, isTemplate) {

 // Modified the if to return if the newValue == oldValue to avoid
 // unecessary trips to the server
 if (isLoading || newValue === '' || newValue == oldValue) {
  return;
 }

 // Instantiate the GetEmailAddress Script Include 
 var getEmailAddr = new GlideAjax('GetEmailAddress');
 // Specify the getEmail method
 getEmailAddr.addParam('sysparm_name','getEmail');
 // Pass the Requested for sys_id
 getEmailAddr.addParam('sysparm_userID', g_form.getValue('u_requested_for'));
 // Send the request to the server
 getEmailAddr.getXML(populateEmailField);


 // When the response is back from the server
 function populateEmailField(response){
  // Extract the email address from the response, clear any value from the email field, 
  // set new value in the email field
  var emailFromScriptInclude = response.responseXML.documentElement.getAttribute("answer");
  g_form.clearValue('u_requested_for_email');
  g_form.setValue('u_requested_for_email',emailFromScriptInclude);
 }
}

Extend a Script Include

Extend a Script Include

Script Includes can extend existing Script Includes by adding new methods and non-method properties.
Although most ServiceNow classes are extensible, the most commonly extended classes are:
  • GlideAjax: make AJAX calls from Client Scripts
  • LDAPUtils: add managers to users, set group membership, debug LDAP
  • Catalog*: set of classes used by the Service Catalog for form processing and UI building
The generalized Script Include script syntax for extending a class is:
Generalized syntax for extending a Script Include
By convention, but not required, Script Include names start with an uppercase letter and are camel case thereafter. This type of capitalization is sometimes referred to as upper camel case. The Script Include name and the new class name must be an exact match.
If the class being extended is from another scope, prepend the class name with the scope. For example, if NameOfClassYouAreExtending is in the global scope, reference it as global.NameOfClassYouAreExtending in your scoped Script Include.
When creating a Script Include, a template is automatically inserted in the Script field:
The Script Include template
The Script Include template prototype must be modified when extending a Script Include.
Notice that the template includes an initialize function. When extending Script Includes, be careful when overriding methods from the parent class such as the initialize function.

On Demand Script Include

In this exercise, you will write an on demand Script Include to validate email address syntax. The Script Include can be used by any scoped application and not just the NeedIt application.

Preparation

Add a string field to the NeedIt table to store an email address.
  1. In Studio, use the Application Explorer to open Forms & UI > Forms > NeedIt [Default view].
  2. In the Field Navigator, switch to the Field Types tab.
  3. Locate the String data type in the Fields Types tab. Click, hold, and drag the String data type to the NeedIt form. Drop the String data type beneath the Requested for field. The Requested for email field
  4. Hover over the new field and click the Edit Properties button (The Edit Properties button is only available on hover) to configure the new field.
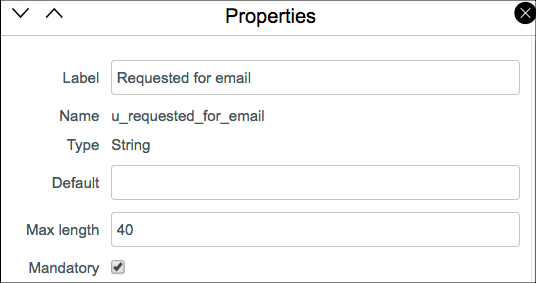
  5. Configure the field: The Requested for email field properties.
  6. Close the Properties dialog by clicking the Close button (The close button is in the upper right of the Properties dialog).
  7. Click the Save button in the Form Design header to add the field to the NeedIt table in the database.

Write the On Demand Script Include

  1. Create a Script Include.
    1. In Studio, click the Create Application File button.
    2. In the Filter… field enter the text Script OR select Server Development from the categories in the left hand pane.
    3. Select Script Include in the middle pane as the file type then click the Create button.
  2. Configure the Script Include:
              Name: validateEmailAddress
              API Name: (this field value is automatically populated)
              Application: (this field value is automatically populated)
              Accessible from: All application scopes
              Active: Selected (checked)
              Description: On demand Script Include to validate email address syntax using regular expressions.
  3. Delete the template from the Script field. Copy this script and paste it into the Script field.
    function validateEmailAddress(emailStr){
      // Use JavaScript coercion to guarantee emailStr is a string
      emailStr = emailStr + '';
      // Compare emailStr against the allowed syntax as specified in the regular expression
      // If emailStr has allowed syntax, return true, else return false
      if(emailStr.match(/^(([^<>()\[\]\\.,;:\s@"]+(\.[^<>()\[\]\\.,;:\s@"]+)*)|(".+"))@((\[[0-9]{1,3}\.[0-9]{1,3}\.[0-9]{1,3}\.[0-9]{1,3}])|(([a-zA-Z\-0-9]+\.)+[a-zA-Z]{2,}))$/)){
       return true;
      }
      else {
       return false;
      }
     }
  4. Click the Submit button.

Use the Script Include in a Business Rule

  1. Create a Business Rule.
    1. In Studio, click the Create Application File button.
    2. In the Filter… field enter the text Business OR select Server Development from the categories in the left hand pane.
    3. Select Business Rule in the middle pane as the file type then click the Create button.
  2. Configure the Business Rule:
              Name: Email Address Syntax Validate
              Table: NeedIt [x_<your_company_code>_needit_needit]
              Active: Selected (checked)
              Advanced: Selected (checked)
  3. Switch to the When to run section and continue configuring the Business Rule:
              When: Before
              Insert: Selected (checked)
              Update: Selected (checked)
  4. Click the Submit button.
  5. Switch to the Advanced section.
  6. Copy this script and paste it into the executeRule function in the Script field. Do not overwrite the template; paste the script after the Add your code here comment.
    // Pass the Requested for email to the Script Include.  Store the return
     // value from the Script Include in the isEmail variable
     var isEmail = validateEmailAddress(current.u_requested_for_email);
     // If isEmail is false (email address syntax is not valid) do not save
     // the record.  Write an error message to the screen.
     if(isEmail == false){
      gs.addErrorMessage(current.u_requested_for_email + " is not a valid email address.  You must provide a valid email address.");
      current.setAbortAction(true);
     }
  7. Click the Update button.
QUESTION: You could write the validation logic in the Business Rule instead of using a Script Include. Given that, why use a Script Include? If you aren’t sure, scroll to the Answers section at the bottom of this page.

Test the Business Rule and Script Include

  1. Switch to the main ServiceNow browser window and use the browser’s refresh button to reload ServiceNow.
    QUESTION: Why do you have to reload ServiceNow? If you aren’t sure, scroll to the Answers section at the bottom of this page.
  2. Create a new NeedIt record or open an existing NeedIt record for editing.
  3. Enter an invalid email address, such as hello, in the Requested for email field.
  4. Click the Additional actions menu (Additional actions menu) and select the Save menu item. Do not click the Submit or Update buttons because that will take you away from the form.
  5. Examine the error message.
  6. Enter a different invalid email address, such as an address with no .com at the end, in the Requested for email field.
  7. Click the Additional actions menu (Additional actions menu) and select the Save menu item.
  8. Enter an email address with valid syntax in the Requested for email field.
  9. Click the Additional actions menu (Additional actions menu) and select the Save menu item. There should be no error message.

Answers

Question: Why not write the email syntax validation in the Business Rule and not in the Script Include?
Answer: Many applications or even tables within the same application will have email fields. Instead of writing the same logic for each application or table, create a Script Include that is accessible by all application scopes. This allows you to write the validation script logic only once.
Question: Why do you have to reload the main ServiceNow browser window?
Answer: You added a field to the NeedIt Default view. ServiceNow had to be reloaded to display the new field on the NeedIt form.

Email validation in Servicenow


  1. function validateEmailAddress(emailStr){
      // Use JavaScript coercion to guarantee emailStr is a string
      emailStr = emailStr + '';
      // Compare emailStr against the allowed syntax as specified in the regular expression
      // If emailStr has allowed syntax, return true, else return false
      if(emailStr.match(/^(([^<>()\[\]\\.,;:\s@"]+(\.[^<>()\[\]\\.,;:\s@"]+)*)|(".+"))@((\[[0-9]{1,3}\.[0-9]{1,3}\.[0-9]{1,3}\.[0-9]{1,3}])|(([a-zA-Z\-0-9]+\.)+[a-zA-Z]{2,}))$/)){
       return true;
      }
      else {
       return false;
      }
     }

Use the Script Include in a Business Rule

  1. // Pass the Requested for email to the Script Include.  Store the return
     // value from the Script Include in the isEmail variable
     var isEmail = validateEmailAddress(current.u_requested_for_email);
     // If isEmail is false (email address syntax is not valid) do not save
     // the record.  Write an error message to the screen.
     if(isEmail == false){
      gs.addErrorMessage(current.u_requested_for_email + " is not a valid email address.  You must provide a valid email address.");
      current.setAbortAction(true);
     }
  2. Click the Update button.

JavaScript Debugger ServiceNow

JavaScript Debugger

The JavaScript Debugger is the primary strategy for debugging Business Rules and other synchronous server-side scripts.
  • Set, remove, and pause at breakpoints
  • Step through code line-by-line
  • Step into and out of functions and method calls
  • View the values of local, global, and private variables
  • View the call stack
The JavaScript debugger components are:
Anatomy of the JavaScript Debugger

Launching the JavaScript Debugger

Only users with the admin or script_debugger roles can use the JavaScript Debugger.
There are multiple ways to launch the JavaScript Debugger:
  • Use the Application Navigator to open System Diagnostics > Script Debugger
  • In Studio navigate to File > Script Debugger
  • Select the JavaScript Debugger button (Launch the JavaScript Debugger from the Script editor
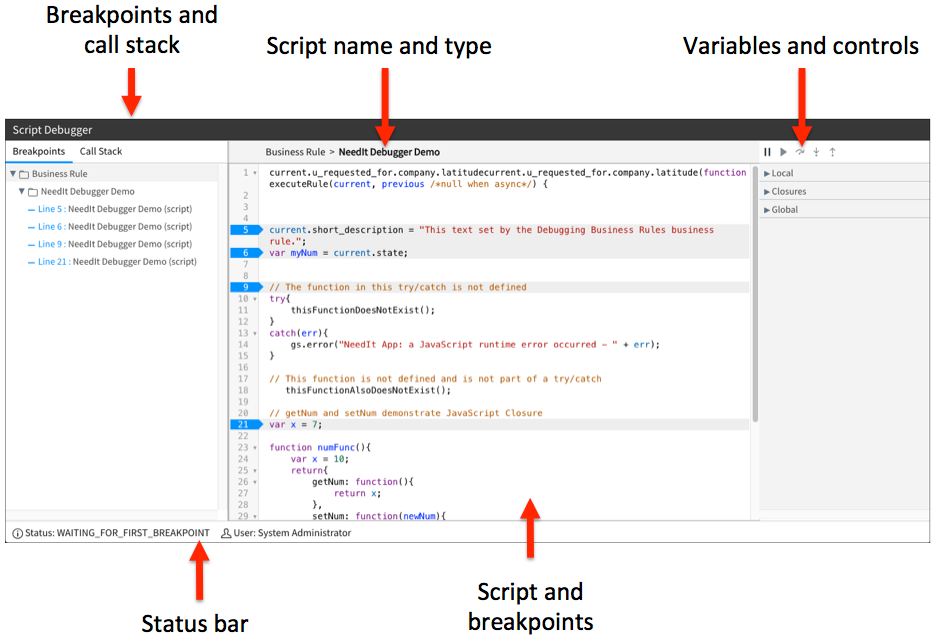
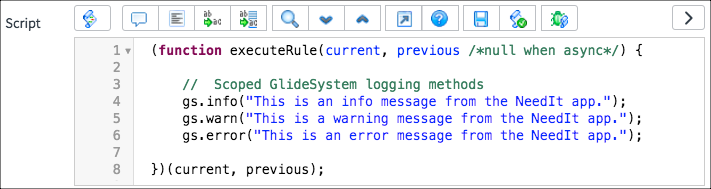
) in the Script editor toolbar.

Debugging Business Rules ServiceNow

Debugging Business Rules

So far in this module, debugging has primarily been:
  • Using the Script Editor to find JavaScript syntax errors
  • Examining scripts to look for errors
  • Verifying the trigger is configured correctly
The strategies used so far are useful but are inadequate for fully debugging. Additional debugging strategies are:
  • System Logs
  • Debug Business Rules (Details)
  • JavaScript Debugger

System Logs

The scoped GlideSystem API has logging methods:
  • gs.info()
  • gs.warning()
  • gs.error()
  • gs.debug() (must be enabled)
All of the logging methods write to the System Log. Pass strings, variables that resolve to strings, or methods that resolve to strings into the logging methods.
gs.error("The value of the Short description field is " + short_description);
To view the log messages, open System Logs > System Log > Application Logs from the Application Navigator in the main ServiceNow browser window (not Studio).
Open the Application Log module from the Application Navigator
This script uses the info(), warn(), and error() methods.
The debug script
The log messages display the time created, verbosity level, message, scope, and script name. The application log
The scoped GlideSystem API also has a gs.debug() method. By default, debug information is not logged even if the gs.debug() method is used in a script. To enable the gs.debug() method, use the Application Navigator to open System Applications > Applications. Click on the application name to open the application record (Don’t click the Edit button for the application as that opens the application for editing in Studio.) In the Related Links section, click the Enable Session Debug link. This option writes debug information to the bottom of forms and not to the system log.
Opening an Application Record

Debug Business Rules (Details)

To debug the Condition field script, enable detailed Business Rule Debugging. Use the Application Navigator to open System Diagnostics >Session Debug > Debug Business Rules (Details). This module turns on logging of debug information to forms and lists. Open the form for a record of interest and force the Business Rule you are debugging to execute by doing whatever is necessary to trigger the Business Rule.
The Debug Business Rules (Details) module is the only way to debug Business Rule conditions
To turn off detailed Business Rule debugging, navigate to System Diagnostics > Session Debug > Disable All.

GlideDateTime ServiceNow

GlideDateTime

The scoped GlideDateTime class provides methods for performing operations on GlideDateTime objects, such as instantiating GlideDateTime objects or working with glide_date_time fields.
Use the GlideDateTime methods to perform date-time operations, such as instantiating a GlideDateTime object, performing date-time calculations, formatting a date-time, or converting between date-time formats. See the GlideDateTime API reference for a complete list of methods.
ServiceNow provides no default logic for managing dates in applications. The NeedIt application, for example, has a When needed field. There is no default logic preventing a user from setting the When needed date to a date in the past.
A user setting the When needed date to 2007.
If you write applications that use dates, you may need to script logic for the date fields. Examples include:
  • Prevent users from selecting dates in the past
  • Do not allow start dates to be after end dates
  • Do not allow new requests to be submitted for today
When working with the GlideDateTime methods, pay attention to the date format and time zones. Some methods use GMT/UTC and some use local time zones. Some methods use the date in milliseconds and some do not.
NOTE: There are some useful methods for managing dates in the GlideSystem API also. For example, gs.daysAgo().

GlideRecord Servicenow

GlideRecord

The GlideRecord class is the way to interact with the ServiceNow database from a script. See the GlideRecord API reference for a complete list of methods.
GlideRecord interactions start with a database query. The generalized strategy is:
  1. Create a GlideRecord object for the table of interest.
  2. Build the query condition(s).
  3. Execute the query.
  4. Apply script logic to records in the GlideRecord object.
Here is what the generalized strategy looks like in pseudo-code:
// 1. Create an object to store rows from a table
var myObj = new GlideRecord('table_name');

// 2. Build query
myObj.addQuery('field_name','operator','value');

// 3. Execute query 
myObj.query();

// 4. Process returned records
while(myObj.next()){
 //Logic you want to execute.  
 //Use myObj.field_name to reference record fields
}
NOTE: The GlideRecord API discussed here is a server-side API. There is a client-side GlideRecord API for global applications. The client-side GlideRecord API cannot be used in scoped applications.

Build the Query Condition(s)

Use the addQuery() method to add query conditions. The addQuery operators are:
  • Numbers: =, !=, >, >=, <, <=
  • Strings: =, !=, STARTSWITH, ENDSWITH, CONTAINS, DOESNOTCONTAIN
The addQuery() method is typically passed three arguments: field name, operator, and value. In some scripts you will see only two arguments: field name and value. When the addQuery() method is used without an operator, the operation is assumed to be =.
When there are multiple queries, each additional clause is treated as an AND.
Queries with no query conditions return all records from a table.
If a malformed query executes in runtime, all records from the table are returned. For more strict query control you can enable the glide.invalid_query.returns_no_rows property which returns no records for invalid queries.

Iterating through Returned Records

There are several strategies for iterating through returned records.
The next() method and a while loop iterates through all returned records to process script logic:
// iterate through all records in the GlideRecord and set the Priority field value to 4 (low priority).
// update the record in the database
while(myObj.next()){
  myObj.priority = 4;
  myObj.update(); 
}
The next() method and an if processes only the first record returned.
// Set the Priority field value to 4 (low priority) for the first record in the GlideRecord
// update the record in the database
if(myObj.next()){
  myObj.priority = 4;
  myObj.update(); 
}
You can also use the updateMultiple() method to update all records in a GlideRecord. If you use the updateMultiple() method you MUST set field values using the setValue() method.
// When using updateMultiple() use the setValue() method.  If you do myObj.priority = 4, ALL
// records in the table will be updated and not just the GlideRecord records.
myObj.setValue('priority',4);
myObj.updateMultiple();

Counting Records in a GlideRecord

The GlideRecord API has a method for counting the number of records returned by a query: getRowCount(). Do not use the getRowCount() method on a production instance as there could be a negative performance impact on the database. If you need to know the number of rows returned by a query on a production instance, use a GlideAggregate.
// If you need to know the row count for a query on a production instance do this
var count = new GlideAggregate('x_snc_needit_needit'); 
count.addAggregate('COUNT'); 
count.query(); 
var recs = 0; 
 if (count.next()){ 
   recs = count.getAggregate('COUNT');
  }
gs.info("Returned number of rows = " +recs);

// Don't do this on a production instance. 
var myObj = new GlideRecord('x_snc_needit_needit');
myObj.query();
gs.info("Returned record count = " + myObj.getRowCount());

Encoded Queries

As already discussed, if there are multiple conditions in query, the conditions are ANDed. If you want to use ORs or if you have a technically complex query, use encoded queries. The code for using an encoded query looks like this:
var myObj = new GlideRecord("x_snc_needit_needit");
myObj.addEncodedQuery('<your_encoded_query>');
myObj.query();
while(myObj.next()){
  // Logic you want to execute for the GlideRecord records
}
The trick to making this work is to know the encoded query syntax. The syntax is not documented so the best thing to do is let ServiceNow build the encoded query for you. In the main ServiceNow browser window, use the Application Navigator to open the list for the table of interest. If there is no module to open the list, type <table_name>.list in the filter field in the Application Navigator.
Use the Filter to build the query condition.
A complicated query
Click the Run button to execute the query. Right-click the breadcrumbs and select Copy query. Where you click in the breadcrumbs matters. The copied query includes the condition you right-click on and all conditions to the left. To copy the entire query, right-click on the condition farthest to the right.
Copying the query
Return to the script and paste the encoded query into the addEncodedQuery() method. Be sure to enclose the encoded query in "" or ’’.
var myObj = new GlideRecord("x_snc_needit_needit");
myObj.addEncodedQuery("u_when_neededBETWEENjavascript:gs.daysAgoStart(0)@javascript:gs.quartersAgoEnd(1)^active=true^state=14^ORstate=16");
 myObj.query();
 while(myObj.next()){
  // Logic you want to execute for the GlideRecord records
 }